How to Make Sure Leads Are Only Enrolled in One Workflow in HubSpot
April 16, 2020
We talk a lot about the importance of lead nurturing here at SmartBug. It’s one of the most important aspects of inbound marketing, especially when you’re creating top-of-the-funnel content.
When you create your first e-book and turn on your first lead nurturing workflow in HubSpot, all's right with the world. It’s simple. Easy, even.
Then you create your second e-book and draft your second lead nurture. It takes you a minute to figure out that there’s a setting under Unenrollment and Suppression to unenroll people from the first workflow if they enter the second workflow. That way they don’t get both lead nurture paths at the same time and end up unsubscribing from your emails entirely.
Then your team works its butt off and generates a bunch of new offers, and you steadily and consistently put out e-books, guides, and white papers, until all of a sudden you realize you’re not sure if you’ve unenrolled all of the previous workflows from the latest workflow.
Now you have to do a big, messy audit to figure out if all of the workflows unenroll from all of the other ones.
There’s a better way!
We have devised a lead nurturing system so HubSpot can do the heavy lifting for you. Check out our process for streamlining your HubSpot lead nurturing workflows so that individuals are only enrolled in one workflow at a time.
Step 1: Create a Custom Checkbox Field
HubSpot has a checkbox field that automatically checks on or off when someone is in a workflow called “Now in Workflow.” We don’t recommend using this field for our lead nurture setup due to the fact that most organizations use workflows for more than just lead nurturing, such as updating custom fields, sending internal notifications, Salesforce automation, and more.
To that end, we recommend creating a custom checkbox field that is called “Currently enrolled in a lead nurture workflow” or something to that effect. (You only need to create this field once, when you are setting up the process.)
Not sure how to create a custom field? Check out this how-to article from HubSpot.
Step 2: Build If/Then Criteria into Existing and Future Workflows
Now that you have a checkbox to indicate if someone is in a lead nurture workflow, you can implement the following into all of your lead nurture campaigns:
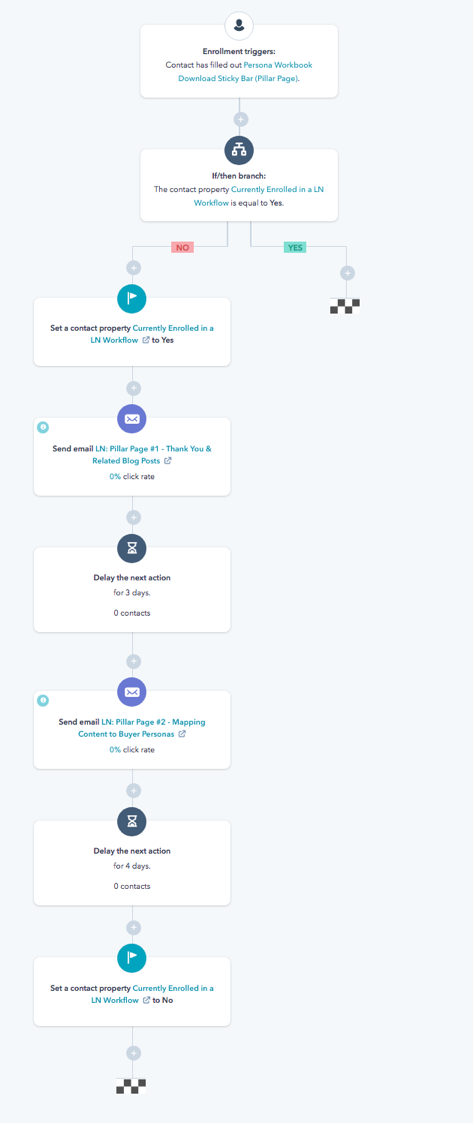
- The first step will be an if/then statement to check if someone already has that box checked.
- If Yes: End the workflow and do nothing.
- If No: Create a step to check the box as “Yes,” and then continue with the rest of the lead nurture path.
- The last step will be to set the checkbox back to “No.” (If you have multiple branches at the conclusion of the workflow, you’ll need to add this to every branch or use the "Go to other action.")

The workflow will check to see if someone is already in a workflow indicated by the checkbox equaling "yes." If they are, then the workflow will end.
If they aren’t, you want to indicate that they are getting emails from this new workflow. To accomplish that, you’ll set the checkbox to “yes.” Now they won’t get emails from other workflows because those workflows will look at the checkbox.
Then you can lay out all of your lead nurturing emails with delays and if/then statements (see screenshot).
As a final step, you’ll uncheck the lead nurturing box because they completed the workflow. We usually put a four to five day delay here before the checkbox so that the person isn’t immediately enrolled in another workflow if he or she takes another action right away. Again, if you have multiple branches here at the end, you’ll want to include this step on every branch or use the "Go to other action."
Step 3: Check Your Work
There are a couple of really important caveats here for the system to work:
- You have to do the if/then criteria and checkbox magic on every single lead nurture workflow in your entire portal in order for this to work. If you already have a bunch of workflows going, you will need to run some lists and manually enroll them in a separate workflow that changes the checkbox to yes.
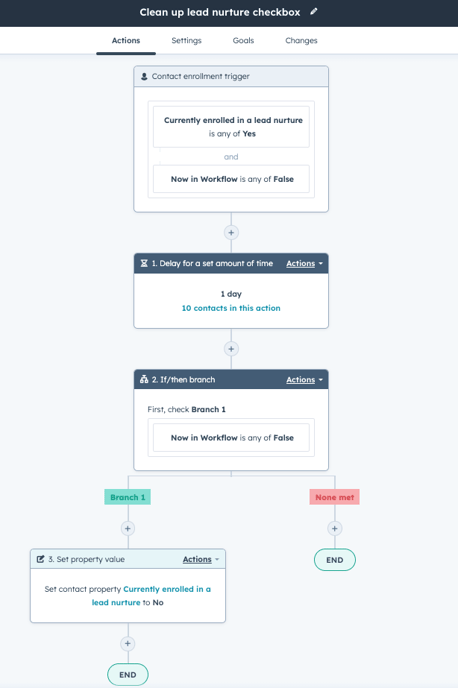
- If someone is unenrolled from a workflow (say they meet the goal), their lead nurture checkbox will still be checked. To solve for this, we recommend creating one additional workflow when you implement the system.

The enrollment criteria should be to check if your custom checkbox is True/Yes and if the default "Now in Workflow" from HubSpot is False (because if that's the case, they aren't in any workflows, including lead nurture ones). This example waits one more day to make sure, and then it sets the custom checkbox "Currently enrolled in a lead nurture" to "No." - One more extra step would be to conduct an audit of the checkbox once a month (set up a list or spot check) to ensure that it is doing what you want it to and nothing wonky is happening!
Why Do We Need That Pesky If/Then Statement at the Beginning?
(I.e. Why Not Just Use the Lead Nurture Checkbox as Criteria for Enrollment?)
The first version of this lead nurture system used the lead nurture checkbox as part of the criteria for enrollment. (After enrollment, the first step would be to set the checkbox to “yes” and then set it back to “no” at the end.)
However, after a quick chat with HubSpot, we realized if all of the workflows were set up this way and someone downloaded multiple assets, that the system would just wait and then enroll them in one after another.
For example, let’s say a prospect downloaded SmartBug’s e-book, Mapping Content for Different Buyer Personas, and that kicked off a lead nurturing workflow. As part of an email from the lead nurture, the person then downloads our Technical SEO Checklist. Because the checkbox is set to “yes,” the person is not enrolled in the webinar’s lead nurture workflow, and they stay in the persona’s workflow. (Good so far, right?) That person would then complete the persona’s workflow entirely, and once they finished the persona’s workflow, the system would change the checkbox to “no” (because that’s the last step).
Now the person would meet the criteria for the webinar workflow (they filled out the form a while ago and the checkbox is currently equal to “no”)—uh oh. So they get enrolled into the webinar e-book workflow. (Not good.) And if they download something else, they will get enrolled in that workflow after completing this one. Ad nauseam.
Bonus: You Can Create a List and Use This List for Exclusion on Promo Emails
Some of our clients are very sensitive to over-emailing their customers—and for good reason—because an opted-in email address is gold to marketers.
To avoid over-emailing, some organizations don’t want to send any promotion emails, monthly newsletters, or other email communications to leads who are currently enrolled in a lead nurture workflow for fear of over-saturating the person’s inbox.
Now that you have a checkbox that indicates if someone is in a lead nurture workflow, you can create a list and use it as an exclusion list for batch emails.
---
That’s the whole system! One custom checkbox, one if/then statement, and a couple of value changes.
What do you think? Would this lead nurture workflow system work for your organization? Is it something you wish you’d done in the beginning and now you are stuck with a mess? We would love to hear your feedback in the comments below!
This post was originally published in August 2018 and has been updated since.

About the author
Jessica Vionas-Singer was formerly the Senior Director of Client Success at SmartBug Media where she lead a team of SmartBugs who focus on HubSpot onboarding for clients new to the system and other project-based work, oversaw new employee onboarding, and rolled out new process and procedures within the Client Services department. She fell in love with marketing at her first job at a technology company specializing in credit evaluation software. Her background includes more than 20 years of marketing experience in content creation and lead-driving tactics, online presence and blog creation, social media engagement, budgeting and project plans, webinar and trade show event management, public relations, comprehensive promotional campaigns, and analytics. Jessica has a BS in Sociology from Montana State University – Bozeman. Read more articles by Jessica Vionas-Singer.


-2.png?width=800&length=800&name=Blog%20header%20image%20(1)-2.png)