


September 8, 2017

Back when I worked in the banking industry, there was a term we used called “wallet share.” (Apparently, this term can be used for any business or industry, but I didn’t know that until I just now Googled it.) Basically, it captures the idea of growing business with your customer for everything in that person’s “wallet.” In the banking world, that might be a checking account, savings account, credit card(s), mortgage loan, auto loan, retirement account, investment accounts, etc.
You can take advantage of this idea in marketing by cross-selling one product to a customer who already has already purchased another product from you. If your customer is happy with your product, service, and company, he or she is more likely to purchase additional products and services from you than someone who is unknown to your company.
There are several ways to cross-sell offerings, including customer emails, salesperson or account rep calls, and even in-person visits, depending on location and type of business.
One tactic I recently employed involved cross-selling using a thank you page in HubSpot, and I wanted to share the ins and outs of how I accomplished this idea for use in your marketing tactics.
Let’s hop on in!
Step 1: Set up your lists
The first thing you’ll need to do is create a list (or, more likely, lists) of people who have each product. In my recurring fictional dog business, I might create the following lists:
- Doggie Daycare (Drop In)
- Doggie Daycare (Monthly Plan)
- Overnight
- Dog Walking Only
Sidenote: Some of our clients track which products a customer has purchased inside of HubSpot and update the product fields when new customers come aboard or sign up for additional products or services. Other clients make sure their CRM (like Salesforce or NetSuite) is always up to date with customer product info, and either that info automatically syncs with HubSpot or it is manually imported into HubSpot. If you aren’t currently tracking which customer has what, that’s a prerequisite to this process!
If you want the customer to be able to indicate interest on an additional product (versus simply reading about it), you’ll also need to set up custom checkboxes (or a drop-down list) for each product, such as “Interested in Overnight” or “Interested in Monthly Plan.”
Make sure to have the form notify you by default when someone submits it, so that you can follow up. (Or set up a workflow or some other process to follow up with the customer.)
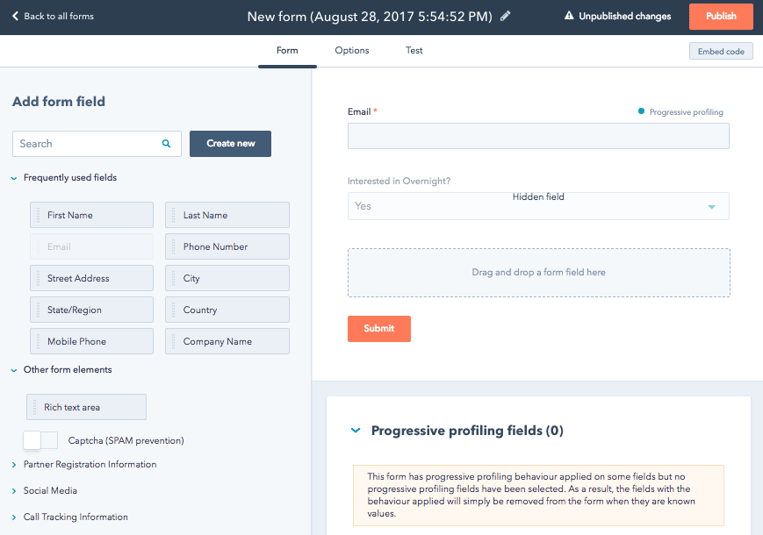
Step 2: Set up your forms
This step can be skipped if you only want to provide information to your client, rather than asking the person to let you know he or she is interested.
For each product you want to cross-sell, you’ll need to create a form with two fields: email address (the field should have Progressive Profiling enabled, so it is hidden when the email address is known) and a hidden field with the product checkbox selected by default. (Then repeat for each additional product.)

Step 3: Set up your thank you page
There’s one important note to consider and that has to do with a technical limitation of HubSpot. Landing pages in HubSpot can take up to 20 minutes to populate the database when someone submits a form. What this means is that for new contacts, a thank you page cannot dynamically change (via smart content demonstrated below or personalization tokens) based on the answers the person just filled out on the form.
So, this method won’t work for someone who, say, just filled out a form to express interest in learning more about doggie daycare, and you want to cross-sell overnight visits; it only works when a contact already exists in your HubSpot database and has a product (or type of product) already selected.
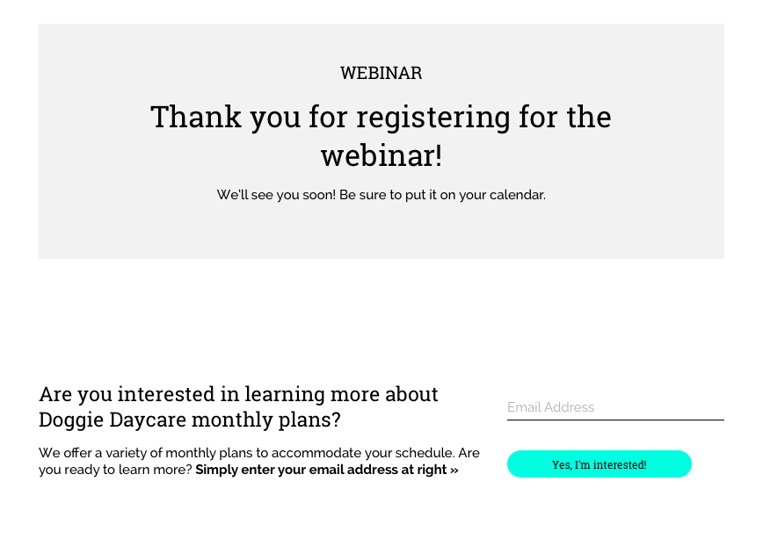
In this example, the landing page will be for a webinar on ways to minimize stress to your dog when you are out of town.
The template of the thank you page will have info on the top, such as “Thanks for signing up for our webinar.”
The bottom section needs to have a rich text module and a form module for our cross-sell options.
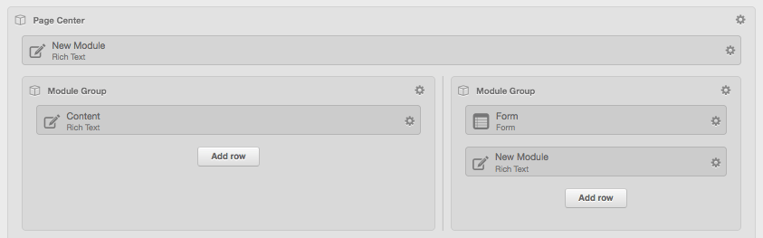
You’ll most likely want the default option to be your core offering—the thing that most people are interested in (in our case, that’s the monthly daycare option) or the product with the least amount of friction, i.e., a low barrier to entry (dog walking). This will be what anyone not yet in your database will see (new contacts who registered for the webinar as their first conversion point).
The rich text module will be the description of the product, and the form module will be the corresponding form for that product.
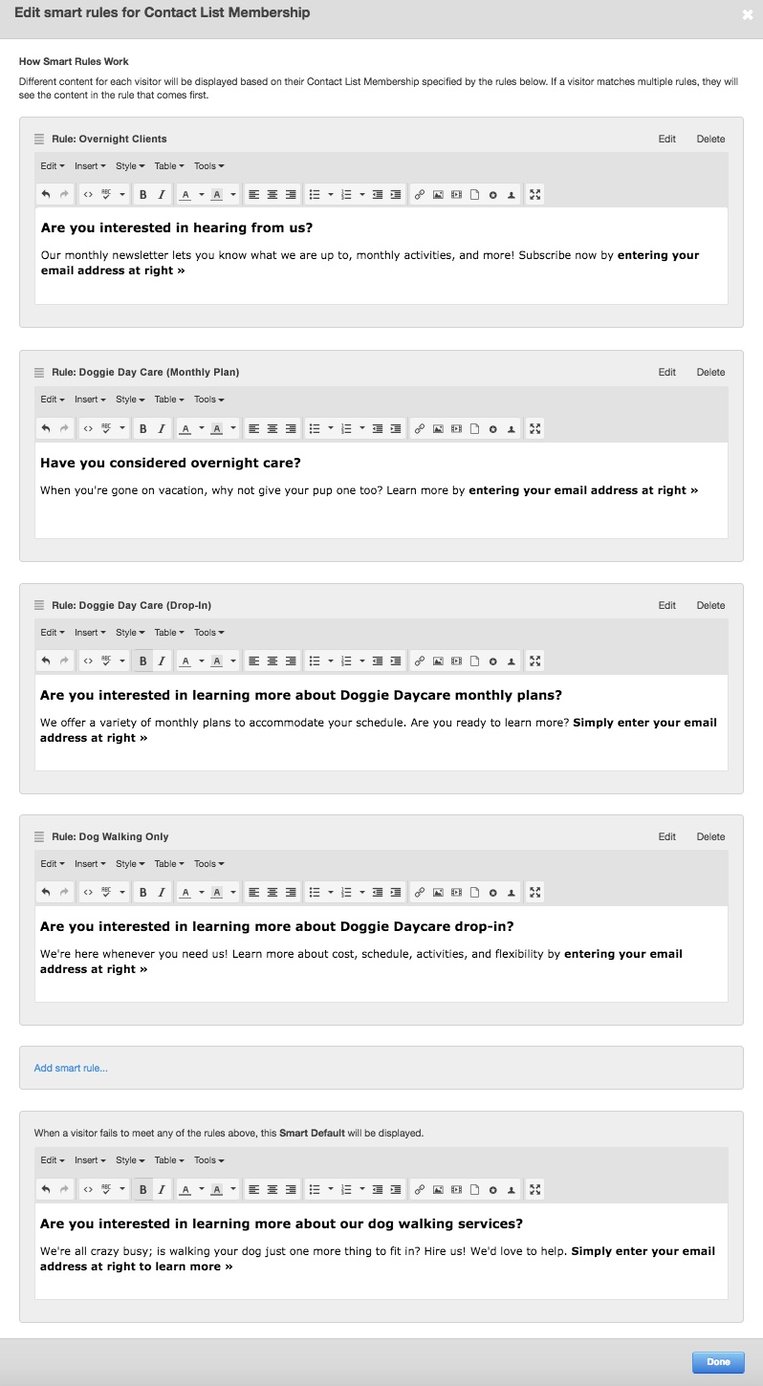
Okay, now the fun begins: It’s time to add some Smart rules and Smart content. If you’re not sure how to do this, check out this article by the HubSpot Academy. We will be basing the Smart rules on the lists created in Step 1.
We’ll be creating a cascading list of products in order of importance and ending with the default. So it’ll look something like this:
- If person is a member of Overnight (list selection):
- Rich text module will ask if the person wants to subscribe to email announcements.
- If person is a member of a Monthly Plan (list selection):
- Rich text module will describe the benefits of leaving your pooch overnight.
- If person is a member of Doggie Daycare Drop In (list selection):
- Rich text module will describe the benefits of a monthly plan.
- If person is a member of Dog Walking Only (list selection):
- Rich text module will describe the benefits of drop-in daycare, since that’s the next product we want to cross-sell.
- Otherwise, use default rich text module that describes the benefits of dog walking.
HubSpot will show the Smart content of whichever list is first, so a person who is a member of more than one list will see the text from the first one. That’s why we start with the largest commitment and go down to the least commitment.
Note: Depending on the way your products and services are structured, you may need to create several lists with AND/OR statements. This can get as complicated or stay as simple as you want. It might be helpful to pencil out on paper how and what to cross-sell. For example if the client has X product and Y product, we pitch a support plan, but if the client has Z product (regardless of X or Y), we present a custom application. Then you can create lists and rich text to support that criteria.
In HubSpot, our Doggie Daycare Smart content looks like this:
Finally, you’ll need to repeat the Smart content process with the form module (in our screenshot, it’s on the right-hand side). In our example, this would be:
- If person is a member of Overnight (list selection):
- Use email newsletter form.
- If person is a member of a Monthly Plan (list selection):
- Use “Interested in Overnight” form
- If person is a member of Doggie Daycare Drop In (list selection):
- Use “Interested in Monthly Plan” form.
- If person is a member of Dog Walking Only (list selection):
- Use “Interested in Drop In” form.
- Otherwise, use default “Interested in Dog Walking” form.
You’ll see above that the list criteria do NOT match the form we’re using; they correspond to what is being cross-sold. This is important to keep in mind when you’re selecting the correct form.
A note of caution: make sure the Smart lists for the forms are in the same order as the rich text fields. For testing, I recommend displaying the hidden product checkbox so you can make sure the text matches the form. (You don’t want to think that a customer is interested in dog walking when the customer really wanted information on overnight stays!)
When everything is working correctly, you can hide the fields, and then all your customers need to do is click the button to say they are interested.
--
What do you think? Could this tactic be useful in your marketing efforts?
Stay tuned for the second blog post in this series on cross-selling products via follow-up emails!

Place the right content in front of the right people with:
Mapping Content For Different Buyer Personas


Other Insights You Might Like
-2.png?width=800&length=800&name=Blog%20header%20image%20(1)-2.png)