
Why Would You Want to De-Index a Page?
July 2, 2018
Do you ever wonder how search results populate so quickly when entering a keyword or phrase into Google? One minute you’re typing in “restaurants near me,” and the next you’re looking at millions of related results. Contrary to popular belief, search engines aren’t actually crawling the web when fetching these results—they’re searching their index of the internet.
Google’s index is a list of webpages that have previously been crawled. In other words, when a webpage is “indexed,” it has the potential to show up on search results. If a page is not indexed, it won’t show up no matter what is typed into Google.
You might be thinking to yourself, “Why would I ever want to hide pages from search engines? I want people to find my website in any way possible—the more pages, the better!” But that’s not always the case. In some situations, it’s best to protect website pages from being crawled by search engines. If your website houses any of the following examples, consider de-indexing:
- Outdated Content: Maybe you have blog posts from a few years ago that aren’t quite up to date with today’s news, but you don’t want to remove them from your website because you plan on updating them at some point. Keep them hidden from search engines now, but index them later.
- Duplicate Content: Google’s algorithm penalizes websites with duplicate content. Do you have a single piece of content that’s offered to visitors in different forms? You’ll want to make sure only one format is visible to search engines. If you do have duplicate content on your site, add canonical tags to avoid penalization. Canonical tags tell search engines which pages are most important. So if you have two pages with the same content, search engines will recognize the page with the canonical tag when they release search results.
- Pages With Little to No Content: Let’s say a customer is shopping on your website, and he finds the perfect item. He fills out the form, and after submitting the order, he’s brought to a confirmation page that says, “Thanks for your purchase!” Because there is very little content on this page, Google and other search engines won’t find it very useful. In this case, you’ll want to block indexing.
- Gated Content: This type of content becomes available to a user after they fill out a form or hand over some type of information. For instance, let’s say you find an e-book you’re interested in, but you have to type in your name and email to download it. This is a piece of gated content. After you submit the form, you’ll likely be redirected to a thank-you page where you can download your offer. It’s important to de-index pages with gated content so that people can’t land on the thank-you page before you receive their information.
These are only a few cases in which de-indexing a webpage might be a good solution. Now you’re wondering, “Well, how do I do it?” There are many ways to block search engines from indexing pages on your website. We’ll walk through how to de-index pages on HubSpot and WordPress using a few common methods: robots.txt, “noindex” tags, and sitemaps.
First, let’s run through a quick recap of each method.
Robots.txt
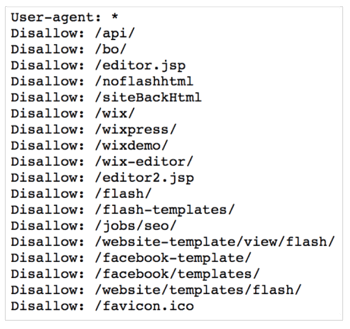
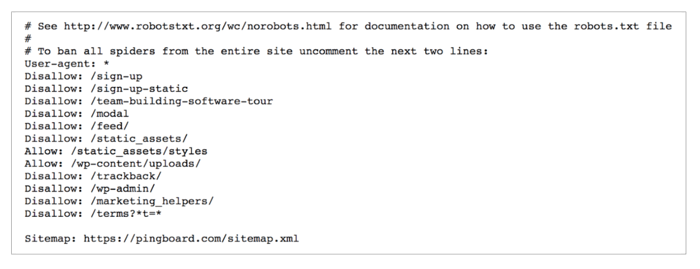
This is a file that websites use to communicate with search engines and other robots. Crawlers read the file to see which pages they should and should not index. You simply type, “Disallow,” followed by a colon and a space, and then enter the relative URL.
Disallow: /relative-URL/
Here’s an example of a website with 18 pages that have been blocked from indexing:
“NoIndex” Tag
A “noindex” tag is another method to use when you want to block a search engine from indexing your webpage. This tag is a line of code that can be added to a website page’s HTML—it must be copied into the head section for proper functionality. The string of code can be found below:
<meta name="robots" content="noindex"
Sitemaps
A sitemap is a list of all pages (or URLs) a user can navigate to on a website. Search engines also utilize sitemaps when indexing website pages. You can submit your sitemap to Google through the Search Console by navigating to “Optimization” and then “Sitemaps.” Here’s an example:
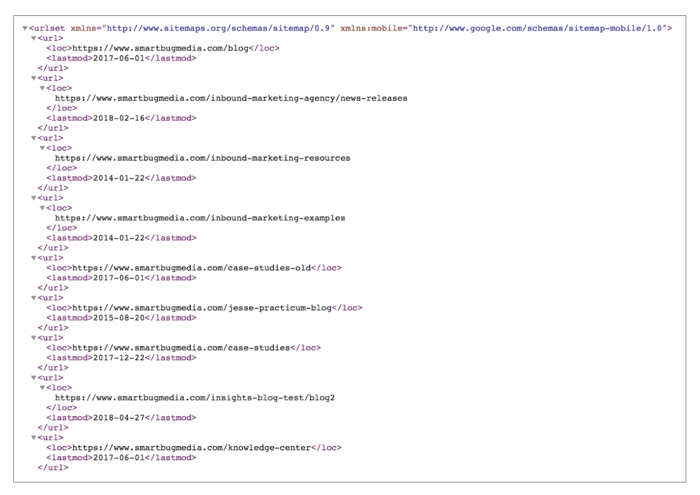
Keep in mind that just because you have a sitemap doesn’t mean all of the pages will be indexed. If Google’s algorithm sees a specific page’s content as low quality, it will not populate that page in search results.
Now that you understand the methods that can be used to de-index pages, let’s dive in. Next up, we’ll show you how to de-index pages using the HubSpot and WordPress platforms.
HubSpot
Robots.txt
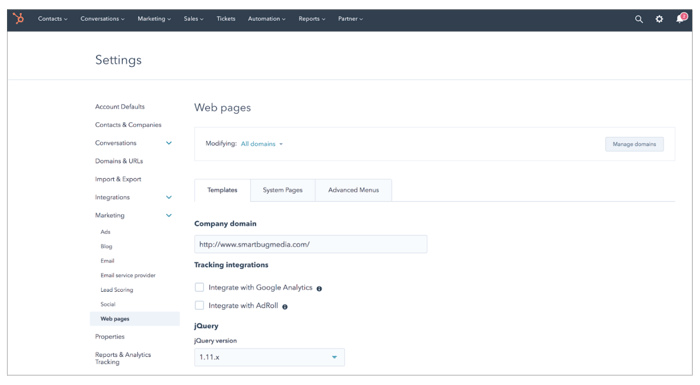
To setup a robots.txt file in HubSpot, navigate to the gear icon (Settings) in the upper right-hand corner. In the left-hand menu, select Marketing > Web Pages. Scroll down, and customize how search engines access your published pages by using the “disallow” functionality. The settings you customize here will apply to all published pages.

“NoIndex” Meta Tag
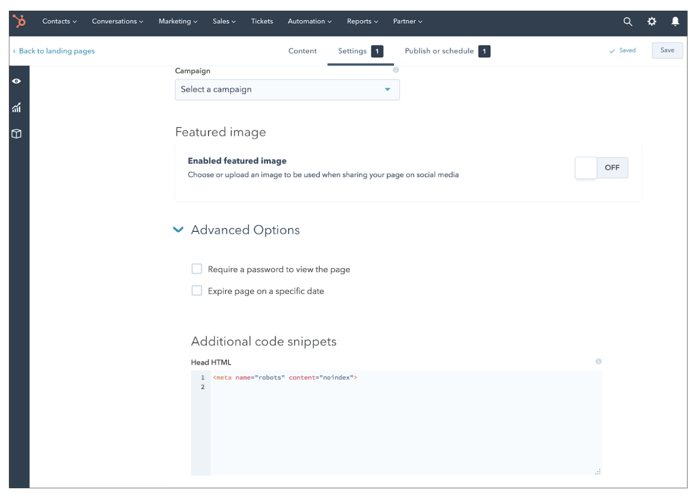
Copy the string of code, and log into your HubSpot Marketing account. Navigate to the page you would like to block from search engines (Marketing > Website > Landing Pages (or Web Pages) > Edit > Settings > Advanced Options > Additional code snippets > Head HTML. Paste the string of code in as shown below.
Sitemap
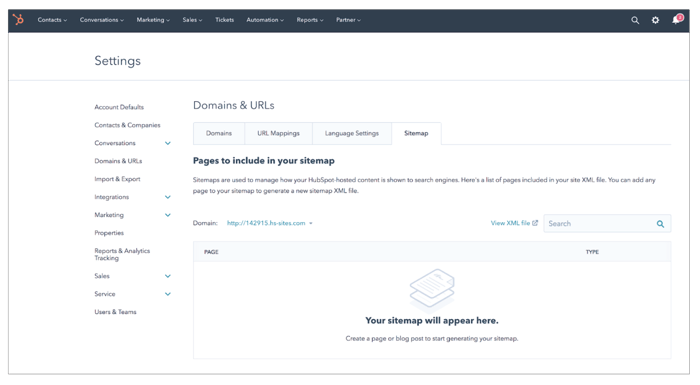
All HubSpot sitemaps can be located by appending /sitemap.xml to the end of the domain. For example: https://www.smartbugmedia.com/sitemap.xml. To update the pages listed in a sitemap, click the gear icon in the main navigation. You can then navigate to Domains & URLs, and select Sitemap. To remove a page from your sitemap, simply hover over the page and click Delete.
WordPress
Robots.txt
If a website is hosted on WordPress, a robots.txt file is automatically created. To locate your file, append /robots.txt to the end of the URL. While this file can be easily located, because it is created by default, you are unable to edit it. If you do not want to use the default file, you will need to create a file on the server.
Creating a file on the server will allow you to edit your robots.txt file. The easiest way to do so is through the Yoast SEO plugin. First, enable advanced features by navigating to SEO > Dashboard > Features > Advanced settings pages > Enabled. Next, navigate to SEO > Tools > File editor. You can then create and edit your robots.txt file.
What if I’m not using an SEO plugin?
Good news! You’re not out of luck. You can still create a robots.txt file and connect it with your website via Secure File Transfer Protocol (FTP). To do so, use a text editor to create a blank file, and name it robots.txt.
Recommended text editor for Windows Users: Notepad++
Recommended text editor for Mac Users: Brackets
In your file, use two commands: user-agent and disallow.

You will then connect your WordPress website to the FTP and upload the robots.txt file to the root folder. Don’t forget to test your file using Google Search Console (Crawl > robots.txt Tester).
“NoIndex” Meta Tag / Sitemap
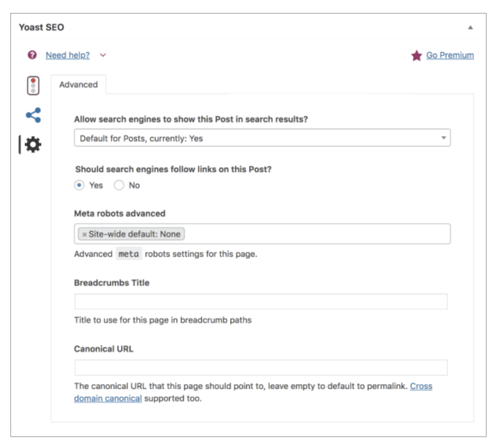
By default, every WordPress post and page is indexed. Another way to block a page from search engines is by adding a “noindex” meta tag through the Yoast SEO plugin. Copy the string of code, and log in to your WordPress account. Navigate to the article or post you would like to de-index. While in the Yoast SEO plugin, click on the gear icon (if you don’t see it, turn on the features by navigating to SEO > Dashboard > Features > On). You can then create a “noindex” meta tag under Meta robots advanced.
Use the same path if you’re looking to remove a page from your sitemap. Under Allow search engines to show this Post in search results? select the no dropdown option.
If you’re not using Yoast SEO, consider downloading another one of the WordPress “noindex” plugins for easy-t0-implement tags.
Get On Your Way
Now that you know why you’d want to de-index a page and how to do so in your platform, it’s time to get started. Create a list of all of your outdated pages, duplicate content, and extraneous pages. Set aside time to update your robots.txt file, add a “noindex” meta tag, or remove the pages from your sitemap. It’s a win-win-win for you, your customers, and search engines.
John Matychuk
About the author
Aubreigh Blair is the SVP, Client Operations for SmartBug. After being introduced to HubSpot in 2014, she began implementing the inbound methodology for both B2B and B2C clients. Aubreigh has experience in a variety of industries including SaaS, financial services, manufacturing, automotive, healthcare, and senior living. Today, she strategizes and implements operational efficiencies to align internal teams, with the ultimate goal of driving revenue growth. Read more articles by Aubreigh Blair.


-2.png?width=800&length=800&name=Blog%20header%20image%20(1)-2.png)