


April 2, 2015
 I
I
If you create a generous amount of blog content on HubSpot you may come to find that there is no out of the box solution for your readers to manage their subsciptions. Currently users must unsubscribe via email rather than your actual blog. If you have multiple categories of blogs your readers may want a central location to see what their current subscriptions are. In this HubSpot tutorial we will take you through the steps necessary to make this a reality, and don't worry it's pretty easy!
Step 1: Adding Unsubscribe Option To Your Blog Settings
For each blog you are managing you are going to need to add the option to unsubscribe. By default you will notice that when you create a blog there are subscription options created as well as their associated lists:
- Weekly Subscribers
- Daily Subscribers
- Instant Subscribers
- Monthly Subscribers
To add an unsubscribe/none option you are going to want to navigate to Contacts > Contacts Settings. In the search bar you should enter in the name of your blog and the result under the Contacts folder should appear as in the image below:
Click the blue name and a window will pop up. Once the window has loaded Click the field that says 'Edit Options'. From here you will be able to add a 5th option. We decided with 'No Thanks' instead of unsubscribe since current readers may not be currently subscribed yet. It should look similar to below:
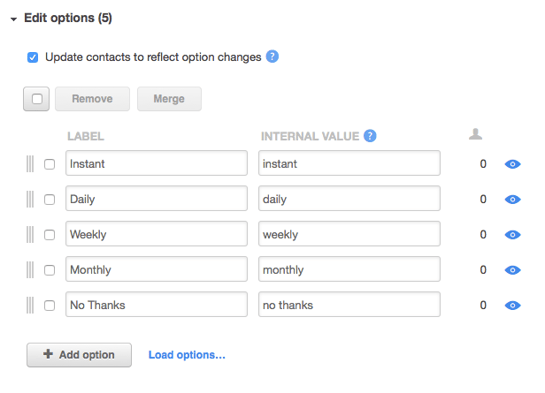
Make sure to hit Save Property at the bottom of the window. Repeat this step for every separate blog that you have.
Step 2: Creating A New Subscription Form
Now we need to actually create the form that will be used for managing subscriptions. So lets navigate again using the black menu bar at the top to Contacts > Forms. In the top right go ahead and click the big blue button that says "Create New Form" and name it something descriptive such as Blog Subscription Management. By default you should have the fields First Name, Last Name, & Email. We are going to want to keep these fields intact for this tutorial. You may choose to remove the name fields but they can be used to personalize your emails should you choose to do so.
On the left hand side, choose the 'Field' tab and search for the name of one of your blogs. When you see the field which shows "Your Blog Name" Email Subscription, click it and it will be added as the next item in your form. 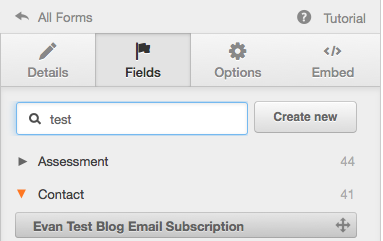
On the right you should now be able to see the field you have just added. Do this for all your blogs you wish to have on your subsciption management form. When you are done simply just save the form.
Step 3: Use The Form
Now you can insert this form on its own subscription management page, or wherever you deem it appropriate.
How does this all work?
Since the 'No Thanks' option doesn't have email subscription preferences tied to it, the subscriber is essentially put in a list that does nothing. If they choose to resubscribe they will be placed back in the list they choose (weekly, instant, etc.)
Step 4: Ensure Current Subscribe Modules Are Correct
This last step is pretty easy and may or may not apply to you. On your actual blog you have likely added a Subscribe Module. When a user subscribes usually they can choose the frequency such as weekly or daily. Be sure to check your blog to make sure that the Unsubscribe/No Thanks option is not present when the user is subscribing. You can change this by simply editing the options of the Subscribe Module in the page template file.
Enjoy your newly discovered ability to have your users manage subscriptions!

Refine your inbound marketing efforts with:
The Ultimate Guide to Inbound Marketing Personas


Other Insights You Might Like
-2.png?width=800&length=800&name=Blog%20header%20image%20(1)-2.png)