


May 14, 2019
In our world of digital, we are all familiar with online portals and gating content behind various forms, sign-ins, or paywalls. This is extremely commonplace in the digital world to access everything from our bank accounts to our streaming subscriptions. And placing all of this data into a form is almost second nature thanks to auto-fill and the many times we’ve had to create a new account in order to use a new service.
But now that your users are turning into customers, how can you gate content for your users on HubSpot? This is where password-protected or login pages come into play on the HubSpot CMS. Each of these provide you and your prospects or customer base the ability to house premium content or resources behind a one-time password or a user-created login. Today, we are going to show you how to create password-protected and login pages in your HubSpot portal, and share some tips along the way.
HubSpot Academy “Prof Tip”
"Another great way to use the membership functionality in HubSpot CMS is to create your own academy. Use this feature in tandem with HubSpot Video to create and host your own training videos or courses for your customers and clients."
- Rachel Sheldon, Inbound Professor
What Are Password-Protected and Login Pages (According to the HubSpot CMS)?
As the heading suggests, both of these types of pages are available in the HubSpot CMS, each with its own pros and cons.
Created back in 2013, a password-protected page is a website page hosted on the HubSpot CMS that asks you to type in a password in order to view the content. There is just one password and anyone who knows the password can view the content behind the gate.
Announced and released shortly after INBOUND 2018, login or membership-based pages are website pages that prompt the user to create a username and password, and once the user types in this information, they can view the content. While these have certain similarities to password-protected pages, the biggest difference is that each user has their own individual login and password to access this content, rather than a single password for everyone.
Note: HubSpot login or membership-based pages are only available to HubSpot Marketing Enterprise Hub portals.

How to Create a Password-Protected Page in the HubSpot CMS
Let’s walk through how to create a password-protected page in your HubSpot portal:
- Go to the website pages or landing pages tool and either create a new page or click on an existing page and go to the edit screen of that page.
- Once you are on the edit screen, click on the “settings” tab at the top of the page.
- On the “settings” tab, scroll down to “advanced options” and click on the dropdown.
- Under “advanced options,” you’ll see the “control audience access” radio buttons. From here, select “Private - Password Required.”
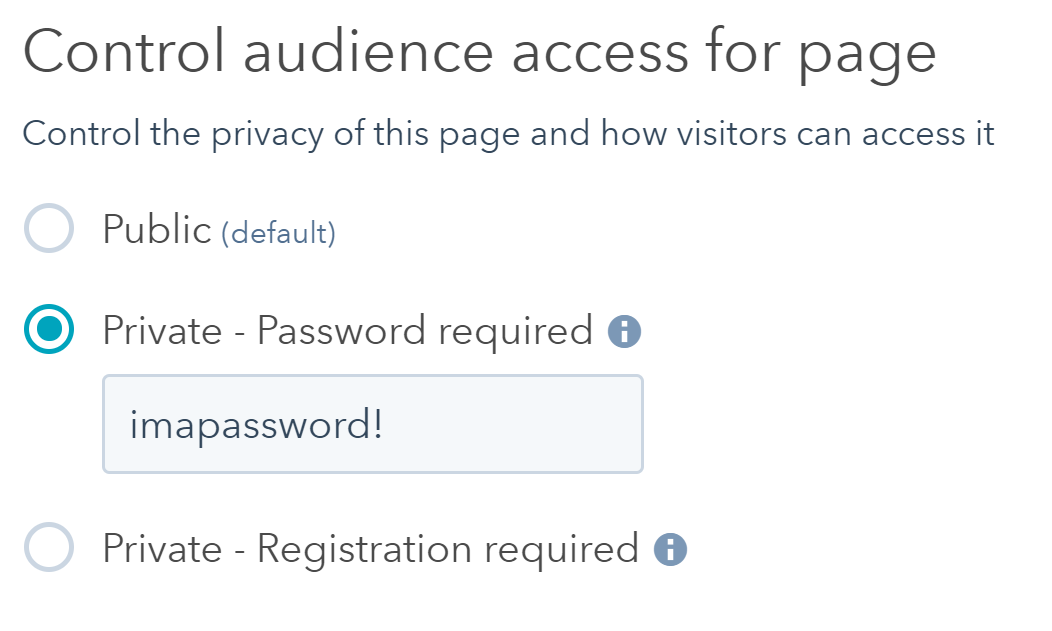
- Enter your proposed password and save and publish the page. You’ll now see under your landing pages and websites that this page is private and behind a password.
After creating these pages for a while in the HubSpot CMS, here are a couple of things we’ve found you need to keep in mind:
- HubSpot does not allow password-protected pages or content to be crawled by search engines.
- Password-protected pages shouldn’t house any sort of personal information. Because it’s a single password, anyone can access this information with a bit of work. The page is also not encrypted in any way, another reason to not put anything sensitive behind the password.
- You don’t need to create a separate password page to house the password in your website or landing pages tool. A password page is created under all of your system pages in the Design Tools section of your portal.
I’ve seen great success in using password-protected pages for internal organizational needs, such as access to surveys and event information for meetups among teams. Password-protected pages are better to use as temporary access areas that are then turned off when their use is complete. You can turn them off by unpublishing or archiving the page in order to prevent users from accessing this content after the date you have in mind.
Documentation: Password Protect a Page (HubSpot CMS)
How to Create a Login or Membership Page in the HubSpot CMS
Now that we’ve done an overview of how to create a password-protected page in the HubSpot CMS, let’s take a look at how to create a login or membership-based page:
- Go to the website pages or landing pages tool and either create a new page or click on an existing page and go to the edit screen of that page.
- Once you are on the edit screen, click on the “settings” tab at the top of the page.
- On the “settings” tab, scroll down to “advanced options” and click on the dropdown.
- Under “advanced options,” you’ll see the “control audience access” radio buttons. From here, select “Private - Registration Required.”
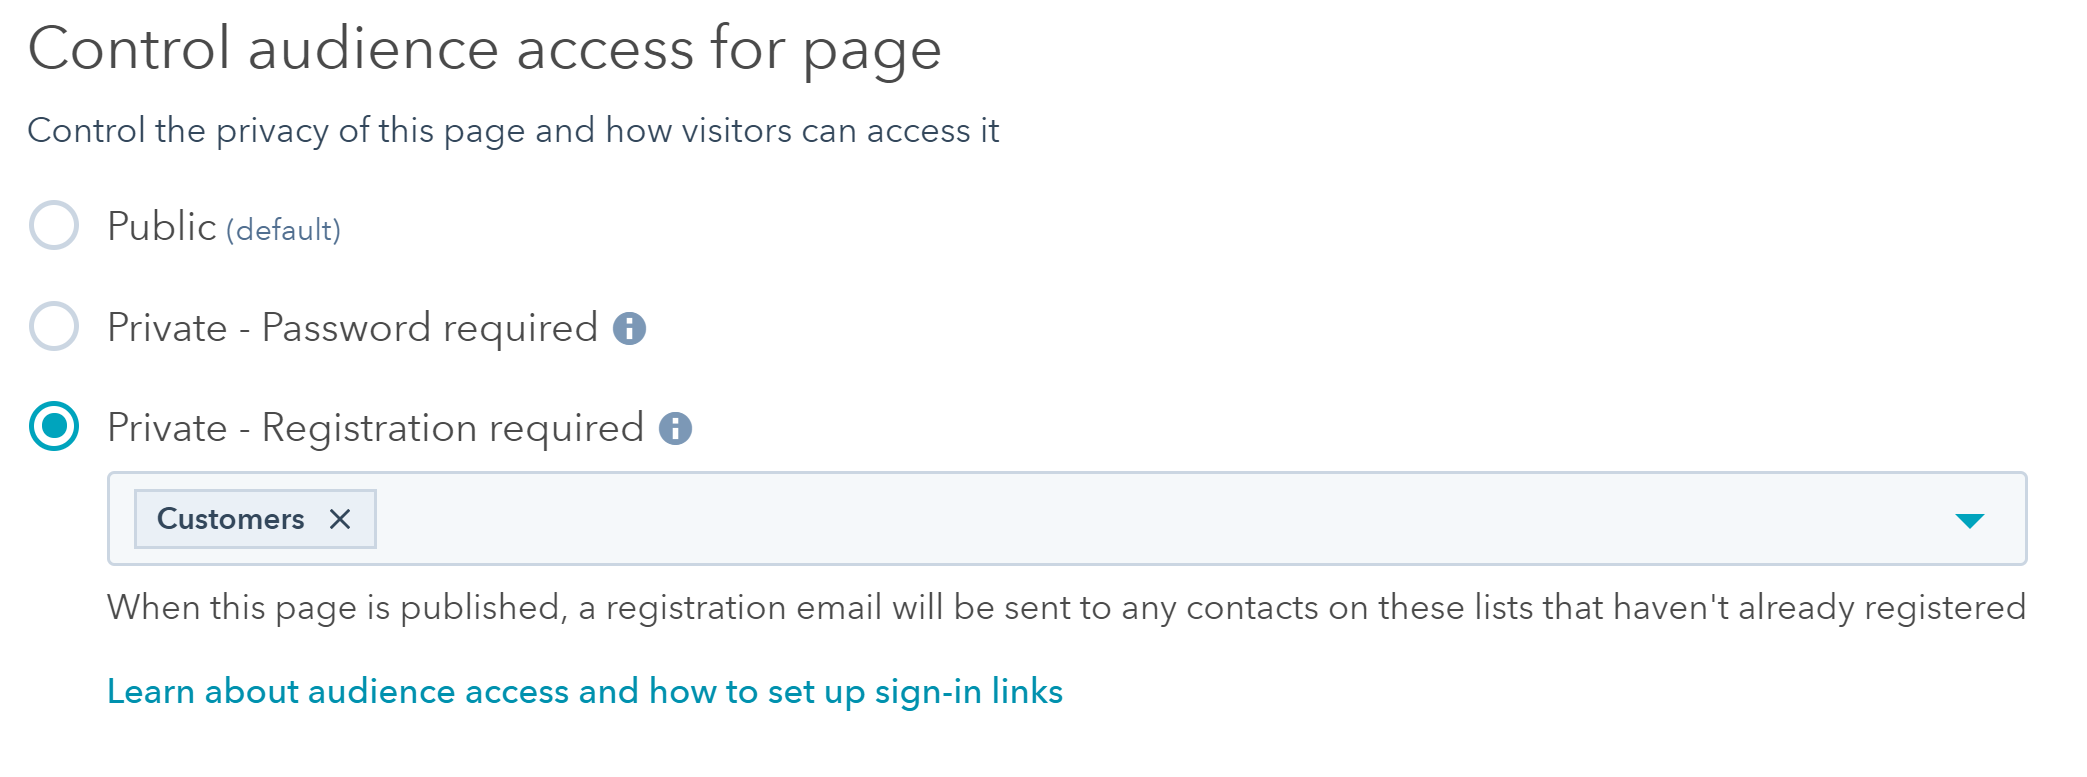
- Once you’ve selected the appropriate lists to see this content, save and publish the page.
Once you publish the page, a registration email will be sent to the contacts in those selected lists that haven’t already registered to this page. These contacts will be prompted to register and log in. A cookie will then be added to their browser and if they access that link on the same cookie, they will not be prompted to log in again.
This feature hasn’t been out for long, but here are a couple of things we’ve noticed in some setups for our clients:
- HubSpot does not allow password-protected pages or content to be crawled by search engines.
- These login or membership-based pages shouldn’t house any sort of personal information. The pages are not encrypted in any way, another reason to not put anything sensitive behind this login or membership access area.
- If someone on the lists can’t access the content or needs login assistance, you can resend the registration email to them directly from their contact record. You can also have them add noreply@domain.com (domain = the domain the page is hosted on) to their address book or whitelist your email-sending IP addresses.
- With this feature, you can also privately register blog pages. You can find this under the “general” tab of the individual blog post you are looking to make private. Once on the general tab, you can check the box next to “This is a private blog - registration required” and add similar lists the way you would for a website or landing page.
I’ve seen great success in using this for event-based signups and customer repositories to access exclusive content. You could also create and house all of your past webinars and product releases under this login process to make it easy for your users to view those materials later (do this instead of creating another landing page).
Documentation: Control Audience Access to Pages and Blogs (HubSpot CMS)
What have you done when using password-protected or login/membership-based pages in the HubSpot CMS? We would love to hear what you’ve already built or what you are thinking of building!
![[Webinar]-5-Advanced-HubSpot-Workflows-You-Can-Build-Today-cover](https://www.smartbugmedia.com/hs-fs/hubfs/Vertical-CTA-Image-Workflows-Webinar.png?width=200&height=260&name=Vertical-CTA-Image-Workflows-Webinar.png)
Are you making the best use of HubSpot's powerful workflow tool? If not, this webinar is for you:
[Webinar] 5 Advanced HubSpot Workflows You Can Build Today


Other Insights You Might Like
-2.png?width=800&length=800&name=Blog%20header%20image%20(1)-2.png)